Pi-Hole, Unbound & Tailscale

This guide covers setting up Pi-hole behind Unbound with DNS over TLS (DoT) talking to Cloudflare/Quad9, all connected via Tailscale.
---
config:
  theme: 'neutral'
  flowchart:
    padding: 20
    subGraphTitleMargin:
      top: 15
      bottom: 15
---
flowchart LR
    classDef device fill:#272822,stroke:#75715e,stroke-width:2px,color:#f8f8f2,rx:4px,ry:4px
    classDef pihole fill:#f92672,stroke:#272822,stroke-width:2px,color:#f8f8f2,font-weight:bold,rx:4px,ry:4px
    classDef unbound fill:#a6e22e,stroke:#272822,stroke-width:2px,color:#272822,font-weight:bold,rx:4px,ry:4px
    classDef cloud fill:#66d9ef,stroke:#272822,stroke-width:2px,color:#272822,font-weight:bold,rx:4px,ry:4px
    classDef block fill:#75715e,stroke:#272822,stroke-width:2px,color:#f8f8f2,rx:4px,ry:4px

    subgraph Clients ["Your Devices"]
        direction TB
        C1["Home Network
(WiFi/LAN)"]:::device
        C2["Roaming
(Tailscale VPN)"]:::device
    end
    style Clients rx:8,ry:8

    subgraph Raspi ["Raspberry Pi"]
        direction TB
        PH{"Pi-hole
(Ad-Blocker)"}:::pihole
        UB("Unbound
(Local Resolver)"):::unbound
        PH -- "Clean traffic
(Port 5335)" --> UB
    end
    style Raspi rx:8,ry:8

    subgraph Internet ["Internet"]
        CF["Cloudflare (1.1.1.1)
or Quad9 (9.9.9.9)"]:::cloud
    end
    style Internet rx:8,ry:8

    C1 -- "Local IP
(Port 53)" --> PH
    C2 -- "Tailscale IP
(Port 53)" --> PH
    UB -- "Encrypted (DoT)
(Port 853)" --> CF
    PH -. "Ads & Trackers
blocked!" .-> Block["Drop
(0.0.0.0)"]:::block
This guide combines three guides and two docs in total:
- Pi-hole’s basic install docs
- Pi-hole’s docs for Unbound
- Block ads from anywhere, by Tailscale
- Cloudflare’s 1.1.1.1 Docs
- Quad9’s 9.9.9.9 Docs
Guide was tested on
Raspberry Pi 3B+Raspberry Pi Zero 2
Take a look at the official Prerequisites from Pi-hole.
This guide is based on any Raspberry Pi with Raspberry Pi OS already installed and connected to a network.
Installing Pi-hole itself
Fastest way:
curl -sSL https://install.pi-hole.net | bashYou can find alternative ways to install Pi-hole here, in case you’d like to see the code that runs on your machine first.
Note that this guide might not be compatible with the docker install variant!
After the install is done, make sure to change your password:
sudo pihole setpasswordIf you are using Pi-hole v5 or earlier, change your password with
sudo pihole -a -p.
Now that Pi-hole is running, we need to tell your home network to actually use it as its default DNS.
Router configuration
-
Go to the devices overview and make sure the current IP address of the Raspberry Pi is set to static. Copy this address.
-
Open the DNS settings and replace the default DNS server’s IP address with the one you just copied.
Now you can add blocklists to your liking.
Some resources:
Installing Unbound
Configuration file
We need to configure Unbound using this config file: /etc/unbound/conf.d/pi-hole.conf
Originally this file is from the Pi-hole Guide. We are making some changes to support DNS over TLS (DoT) via Cloudflare/Quad9.
Note that the file does not exist on a fresh install and needs to be created.
The name is up to you.
The complete file should look like this. You can copy paste it directly.
I’ll explain the differences to the original file in the next step.
1
2
3
4
5
6
7
8
9
10
11
12
13
14
15
16
17
18
19
20
21
22
23
24
25
26
27
28
29
30
31
32
33
34
35
36
37
38
39
40
41
42
43
44
45
46
47
48
49
50
51
52
53
54
55
56
57
58
59
60
61
62
63
64
65
66
67
68
69
70
71
72
server:
    # If no logfile is specified, syslog is used
    # logfile: "/var/log/unbound/unbound.log"
    verbosity: 0

    interface: 127.0.0.1
    port: 5335

    do-ip4: yes
    do-udp: yes
    do-tcp: yes

    # TLS settings
    tls-upstream: yes
    tls-cert-bundle: "/etc/ssl/certs/ca-certificates.crt"

    # May be set to yes if you have IPv6 connectivity
    do-ip6: no

    # You want to leave this to no unless you have *native* IPv6. With 6to4 and
    # Terredo tunnels your web browser should favor IPv4 for the same reasons
    prefer-ip6: no

    # Use this only when you downloaded the list of primary root servers!
    # If you use the default dns-root-data package, unbound will find it automatically
    #root-hints: "/var/lib/unbound/root.hints"

    # Trust glue only if it is within the server's authority
    harden-glue: yes

    # Require DNSSEC data for trust-anchored zones, if such data is absent, the zone becomes BOGUS
    harden-dnssec-stripped: yes

    # Don't use Capitalization randomization as it known to cause DNSSEC issues sometimes
    # see https://discourse.pi-hole.net/t/unbound-stubby-or-dnscrypt-proxy/9378 for further details
    use-caps-for-id: no

    # Reduce EDNS reassembly buffer size.
    # Suggested by the unbound man page to reduce fragmentation reassembly problems
    edns-buffer-size: 1472

    # Perform prefetching of close to expired message cache entries
    # This only applies to domains that have been frequently queried
    prefetch: yes
    prefetch-key: yes
    rrset-roundrobin: yes
    qname-minimisation-strict: yes
    hide-identity: yes
    hide-version: yes

    # One thread should be sufficient, can be increased on beefy machines. In reality for most users running on small networks or on a single machine, it should be unnecessary to seek performance enhancement by increasing num-threads above 1.
    num-threads: 1

    # Ensure kernel buffer is large enough to not lose messages in traffic spikes
    so-rcvbuf: 1m

    # Ensure privacy of local IP ranges
    private-address: 192.168.0.0/16
    private-address: 169.254.0.0/16
    private-address: 172.16.0.0/12
    private-address: 10.0.0.0/8
    private-address: fd00::/8
    private-address: fe80::/10

forward-zone:
    name: "."
    # Cloudflare
    forward-addr: 1.1.1.1@853
    forward-addr: 1.0.0.1@853
    # forward-addr: 2606:4700:4700::1111@853
    # forward-addr: 2606:4700:4700::1001@853
    forward-ssl-upstream: yes
Configuration Breakdown
Essentially we are making two changes:
- TLS Configuration
- Location of the Cloudflare server
First, under the server: group.
This tells unbound to use encryption while resolving names.
server:

    ... other configurations

    # TLS settings
    tls-upstream: yes
tls-cert-bundle: "/etc/ssl/certs/ca-certificates.crt"Second, at end of the file.
This tells unbound where to ask for names.
If you need IPv6 resolution, you can uncomment it here. Note that you also need to configure this in pihole itself.
forward-zone:
    name: "."
    # Cloudflare
    forward-addr: 1.1.1.1@853
    forward-addr: 1.0.0.1@853
    # forward-addr: 2606:4700:4700::1111@853
    # forward-addr: 2606:4700:4700::1001@853
    forward-ssl-upstream: yes
The full documentation of Cloudflare’s 1.1.1.1 can be found here.
Using Quad9 as an alternative
Since Cloudflare is hosted in USA, some people might prefer Quad9, hosted in Switzerland.
forward-zone:
    name: "."
    # Quad9
    forward-addr: 9.9.9.9@853
    forward-addr: 149.112.112.112@853
    #forward-addr: 2620:fe::fe@853
    #forward-addr: 2620:fe::9@853
    forward-tls-upstream: yes
The full documentation of Quad9’s 9.9.9.9 can be found here.
Restart Unbound
After you saved the pi-hole.conf file, run
sudo service unbound restartUnbound is now up and running!
Configuring Pi-hole to use Unbound
Now we need to tell Pi-hole about this new DNS resolver.
-
Open the Pi-hole Web interface and navigate to the DNS settings.
-
Specify unbound as a custom DNS server in your Pi-hole dns configuration using the following address:
127.0.0.1#5335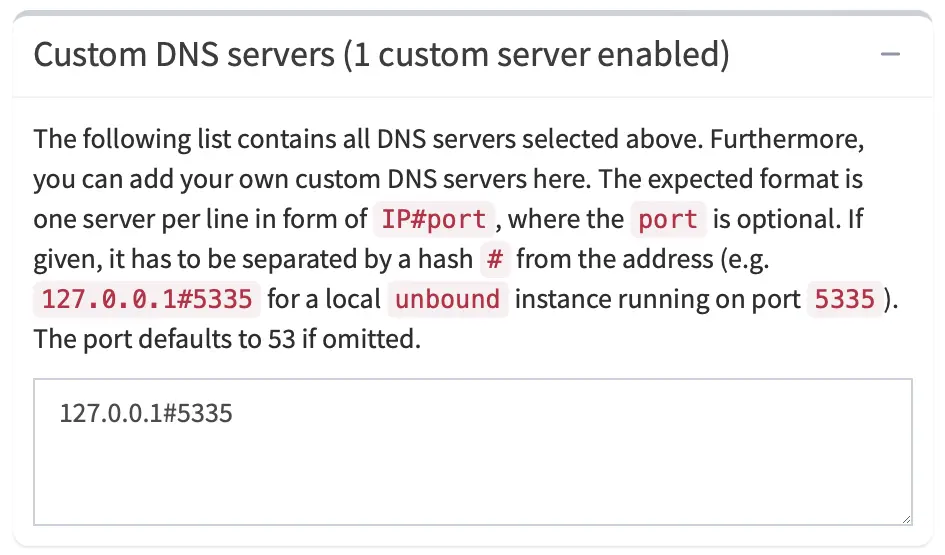
-
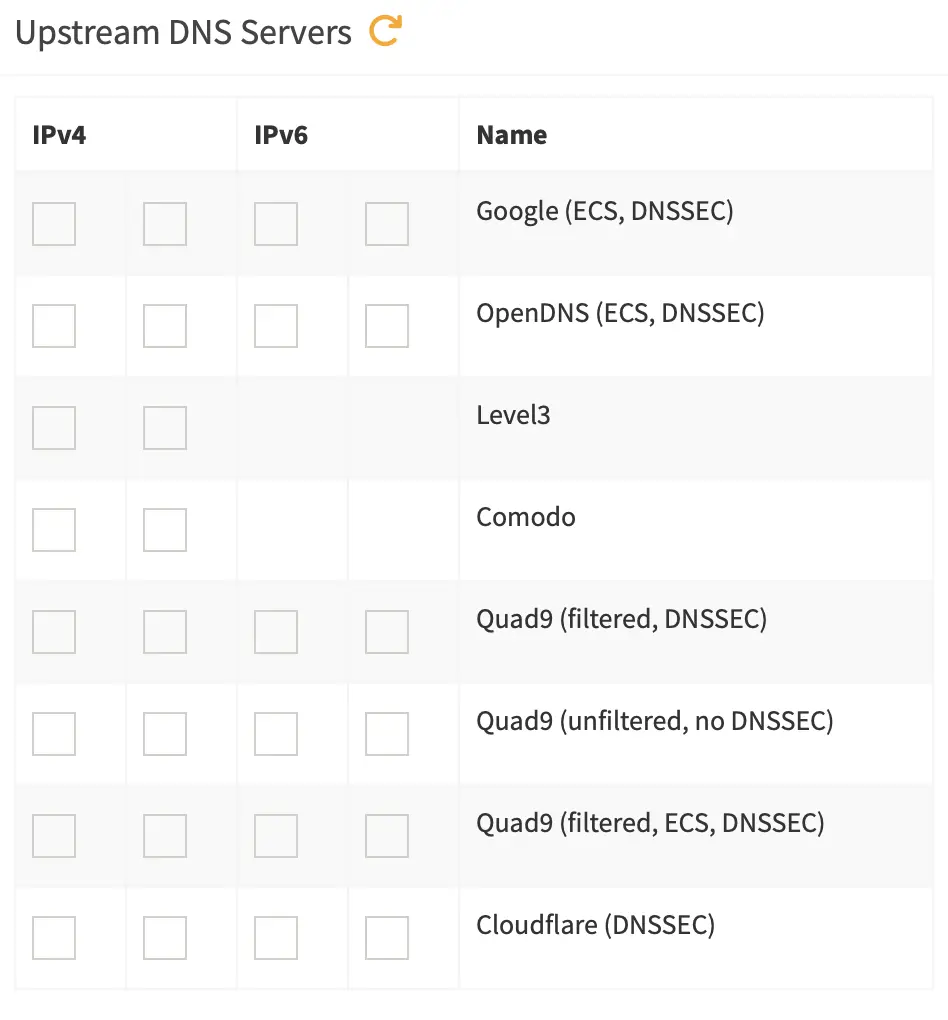
Untick every other dns server.
-
Apply / Save these settings.
-
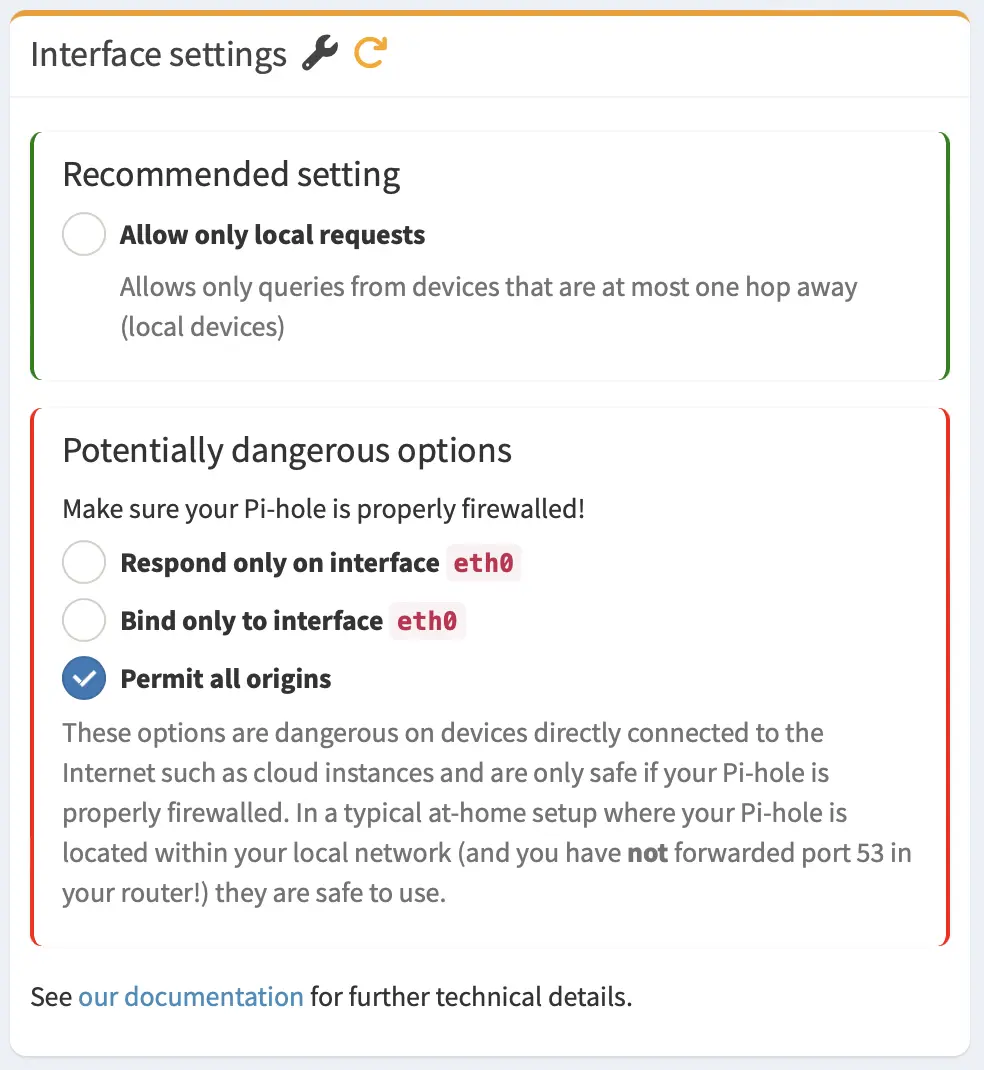
To make tailscale work later, also change the
interface settingstoPermit all origins.
Before you enable Permit all origins, ensure that your Raspberry Pi is behind a firewall. Otherwise you’ll create an open DNS resolver for the whole internet.
If you don’t plan to install and use Tailscale, you can safely skip this configuration step (5).
Now you can test the configuration with various test cases from the original guide, or you can use this website.
Why we need Unbound
You could technically put Quad9’s or Cloudflare’s address into the custom DNS server configuration for Pi-hole. But I still included it in this setup. Why is that?
Pi-hole is only an ad-filter. It usually sends plain-text messages to your internet service provider (ISP), which means your ISP can see what websites you are visiting. By configuring and routing traffic through Unbound, you enable DNS over TLS (DoT), which encrypts your queries to Cloudflare or Quad9 and prevents snooping. Additionally, this setup also ensures security through local DNSSEC validation and improves performance with local caching.
Install and run Tailscale
-
Create a tailscale account here.
- Install tailscale on the raspberry pi:
curl -fsSL https://tailscale.com/install.sh | sh - To start Tailscale, run
sudo tailscale upTailscale will give you a link.
-
Copy the link and paste it in your browser. Accept the pi as a new device in your Tailscale network.
-
Go to the Tailscale machines tab.
-
Copy your Pi-hole’s Tailscale-Network IP address
-
Go to tailscale dns settings.
-
Look for the Nameserver headline.
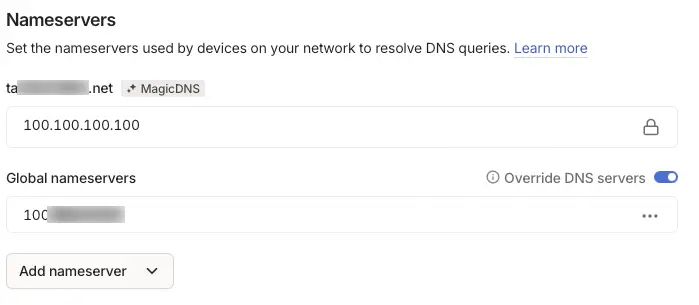
- Under global nameservers, switch
override dns serversto active.- Click on
Add nameserver - Click on
New custom nameserver - Paste the copied IP address.
- Click on
Done.
You can now install Tailscale on all your devices. This will allow you to block ads, as long as you’re connected to the Tailscale network or your local Wi-Fi.
Additional words to privacy
If you’re an advanced user, I would recommend using Headscale instead of Tailscale. It’s an open-source, self-hosted version of the Tailscale control server. Tailscale is free for a limited number of users and devices, but its control server is closed source.
Although hosting your own control server with Headscale can be time-consuming and difficult, it would significantly enhance privacy and security.